| Superplex Daylight Loading Developing Tank |
|
|
|
|
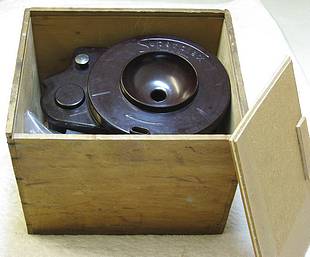
The Superplex tank was obtained in a wooden sliding top wooden box (maybe original) complete with its original instructions, and these are available as a pdf download here. The text and pictures from those instructions are used below in explaining the workings of the Superplex. |
||||||||||||||
|
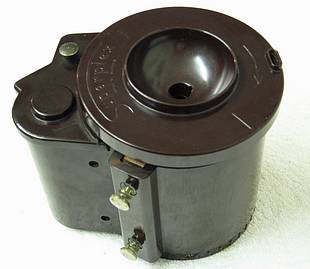
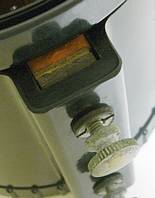
In many ways the Superplex tank resembles a conventional darkroom loading tank. It is constructed of dark red Bakelite with a push-on light tight lid covering a circular chamber containing a conventional plastic, adjustable, spiral. A top central opening in the lid allows pouring in developer & fixer and a peripheral spout is provided for solution emptying. But there are two additional features which distinguish the Superplex from more conventional darkroom loading tanks. The most obvious is the side chamber with a light tight lid, and the second is that two thumb wheels on the side of the main chamber screw into a vertical channel and push against a red rubber sealing strip ('m' in Fig F, see below). |
 |
 |
||||||||||||
| Instructions for the
use of the "SUPERPLEX" Daylight Loading Universal Developing
Tank. (text coloured like this in the instructions below, are my own explanatory notes.) |
||||||||||||||
| Instructions start: Although the Superplex works completely automatically, it is advisable to read the instructions given herewith carefully, in order to make sure of good results. The Tank will develop all sizes and makes of roll film from 15/8"x2½" (V.P. = 127) up to and including 2½"x4¼" (No. la = 116) with the exception of films exposed in roll film adapters for plate cameras. |
||||||||||||||
| The
"Superplex" consists of the following parts: Detachable Film Spool Carrier. Outer Tank Case. Developing Tank. Adjustable Film Spiral. Outer Tank Case Lid. Developing Tank Lid. Black Rod. Red Stirring Stick. Interchangeable Screws for Film Spool Carrier. Safety Clip. 1 Small Brass Cassette for Films up to 6x6cm. 1 Large Brass Cassette for Films 3¼"x2¼'' and 4¼"x2½". |
 |
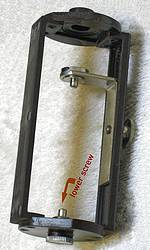
Above: Film spool carrier, safety clip and brass cassettes, black rod and red stirring stick. Also, packets containing the interchangeable screws for the film spool carrier. |
||||||||||||
| Preparing the Film for
Developing: The exposed film has to be unrolled with the utmost care until about a quarter of an inch of the celluloid strip (exposed film !) can be seen. In order to prevent any further unrolling of the film a safety clip is supplied with every tank and can be applied to keep the remainder of the film perfectly tight. Some films on the market have a gummed strip at the end of the film which must be removed completely. Fold over the edge of the celluloid film about one eight of an inch (3mm), the emulsion side being folded outwards. Great care should be taken in making a sharp neat fold, as this is of the greatest importance to guarantee successful threading of the film onto the spiral. Now remove the safety clip and tightly roll the film up again, replacing the edge of celluloid strip into its original position. (presumably means: roll the film back up again, encompassing the folded end of the celluloid film inside the backing paper, as was the case before the procedure was started). |
||||||||||||||
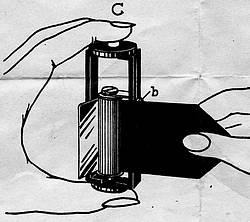
| Loading the film Carrier: Having prepared the film according to the detailed description above, the spool is now fitted into one or other of the brass Cassettes Fig.'A' according to the size of the film; care being taken to see that the slotted end of the film spool is facing downwards. The flange of the Cassette must point left, and the end of the paper backing must point right, see Fig.'a'. |
  |
|||||||||||||
|
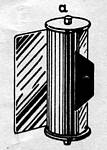
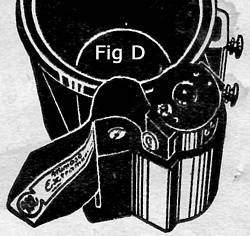
The Cassette and film spool is now inserted into the film carrier as shown in Fig.'B'. The adjustable metal arm 'b' will be on the right. The lower and side screw 'b' are now tightened up until the spool is firmly seated. Particular care must be taken to see that the spool is properly seated on to the lower screw, which must be tightened right up. When developing No. la roll films (2½" x 4¼" = 116) the lower screw must be first unscrewed, the metal arm 'b' being opened out to the fullest extent, and the cassette and spool now inserted, care being taken to see that the peg on the lower screw sits firmly into the spool. The metal arm is then adjusted into position and tightened. The loaded film carrier is next held in the left hand and about 6" (150mm) of the covering (backing) paper drawn out as is illustrated in Fig.'C'. The carrier has to be fitted into the outer Tank case, see Fig.'D', the covering paper being drawn through slit 'c' Fig.'F'. The flange on the Cassette must point in the direction of slit 'c'. |
  |
|||||||||||||
 |
 |
 |
||||||||||||
|
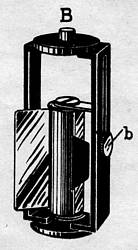
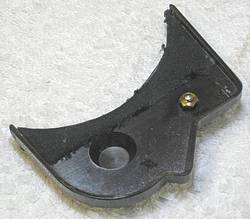
The outer Tank case lid may now be screwed onto the outer (side) Tank case (see alongside; also Item 'X' in Fig G, below). This lid is secured by screwing down the serrated edged thumb wheel. The picture to the right shows the top of this outer case lid, while to the extreme right is the underside, showing the light trapping fabric near the edge. |
 |
 |
||||||||||||
|
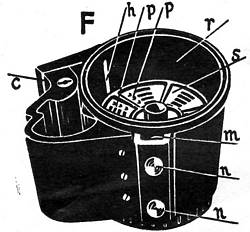
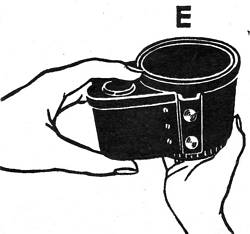
Threading the film on to the Spiral: As shown in Fig. E. the Tank should be taken in the left hand. Then loosen the two (side wall) screws 'n' Fig. F. and turn the lower edge of the Tank to its fullest extent in an anti-clockwise direction. Now the two screws 'n' have to be tightened again so as to keep the inner Tank in this position. Next place the film spiral into the inner Tank after having adjusted them according to the size of the film to be developed. (The circumferential lines around the centre core of the spiral, see picture extreme right, provide 'click stops' that position the upper spiral at the correct distance from the lower spiral.) |
 |
 |
||||||||||||
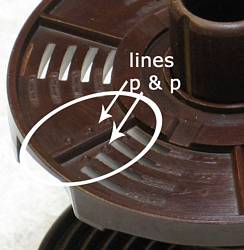
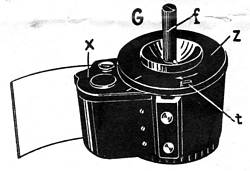
| Care must be taken to see that the dotted lines on the top of the spiral, ('p' & 'p', alongside & Fig F) are opposite the guiding springs overlapping the inner Tank slit, ('h' in Fig F, above). The exact fit can be controlled when the film spiral drops onto the three pegs in the bottom of the Tank. Now fix the lid on to the Tank according to the corresponding lines and the black locking stick 'f' fig. G. can be inserted into the hole in the lid, resulting in an immovable position of the spiral. |
 |
|
||||||||||||
|
During the threading of the film onto the spiral (the next operation), the black locking stick remains in this position. Attention should be paid to the fact that the Tank lid must be fixed securely by engaging the small pin under the Tank lid into the appropriate notch at the side of the Inner Tank. Now carefully start pulling the film covering paper slowly and evenly always in the horizontal direction, through incision 'c' Fig.F until No.1 on the covering (film backing) paper of the film appears, when special care should be taken until the film unwinds rather less easily. This resistance marks the point where the film is sealed onto its covering (backing) paper. In many makes of films the celluloid film is only lightly attached to the wrapping paper and, therefore, detaches itself easily. But when the gummed strip is made of stronger material such as calico, etc., the film has to be pulled out most carefully until the beginning of the celluloid film and the sealing paper appear in the slit 'c'. Fig. F. Then, with a pair of scissors, cut the gummed strip so that the celluloid film is completely separated from the covering (backing) paper which can now be removed entirely. |
 |
|||||||||||||
|
The small slotted brass plate which will be found in a separate envelope is then taken in the hand and is used to push back into the Tank the end of the celluloid film appearing in incision 'c' Fig. F. The black locking stick is now replaced by the red stirring stick which must be turned in the direction of the arrow on the Tank lid. By means of this movement the celluloid film is being threaded on to the spiral in its entire length (meaning: the loading of the end section of film, onto the spiral, is being completed). After this it is necessary to make the inner Tank water-tight and in order to do this, first loosen the two screws 'n', see Fig. F (also the picture alongside) and hold the Tank again as shown in Fig. E. Turn the bottom of the Tank in the direction of the arrow on the lid until a complete stop is reached, tighten up the two screws 'n' and the Tank is now completely closed in readiness for the developing process. |
 |
|||||||||||||
|
Development & Fixing:
In order to avoid any possibility of air bubbles settling on the film and causing faulty development, the red stirring stick should be freely used with every fresh solution. |
||||||||||||||
| Final Rinsing: The final rinsing should take place in a separate vessel. The film can be removed from the spiral as shown in Fig. K or by simply lifting the spiral top, thus releasing the entire film. Cleaning the Tank: After use the Tank should be thoroughly washed in clean, fresh water and the spirals and interior of the Tank thoroughly dried. |
 |
|||||||||||||
|
Differences in Roll Film Spools: The Superplex is delivered with the correct screws for developing normal (120) 2¼" x 3¼" or (116) 2½" x 4¼" roll films. General Rules: |
||||||||||||||
|
|
||||||||||||||
 The
Superplex daylight loading developing tank was made in Austria
by Friedrich Fisher, Vienna, sized for developing roll films
of 127, 120/620 and 116/616 sizes. It cost 45/- (£2.25p)
in 1937. It has many features in common with the Simplex tank,
also for roll film but only of 120/620 size, and the pictures
of the Superplex (below) and the Simplex (
The
Superplex daylight loading developing tank was made in Austria
by Friedrich Fisher, Vienna, sized for developing roll films
of 127, 120/620 and 116/616 sizes. It cost 45/- (£2.25p)
in 1937. It has many features in common with the Simplex tank,
also for roll film but only of 120/620 size, and the pictures
of the Superplex (below) and the Simplex (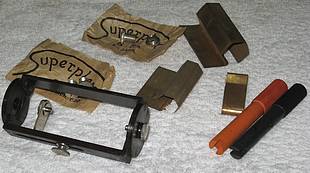
|
|
|